

Introduction to React JS Routes
React JS builds one page applications. I have explained about this in my React for beginners article. You need to use React Router when you want to have multiple "pages" or "views" for your application.
A single page application (SPA) works differently than a normal website for example. For a SPA, React Router module checks a History of URL's and then delivers to React the right component corresponding to the URL which was clicked. Like in the below image:

Install React Router
After you have created a new React application, you will need to install React Router module. If you do not know how to create a React app, please refer to my React article. I use Visual Studio Code for my projects.
Open the terminal and add the following command (be sure that you are inside your React app folder):
npm install --save react-router-domHit enter and wait for it to install.
Create components for routes
In order to explain how routes work in React, we will create some components which will be used to render different content for different routes.
Let's create a new folder called components, inside src folder, and add three new components: home.js, about.js and contact.js.
Will add some very simple code to each one:
import React from 'react';

const Home = () => {
    return (
        <div>
            <h1>Home</h1>
            <p>Lorem ipsum dolor sit amet, consectetur adipiscing elit. Quisque finibus mi vitae ante vestibulum, ac semper leo imperdiet. Sed placerat ante ut rutrum iaculis.</p>
        </div>
    )
}

export default Home;import React from 'react';
const About = () => {
return (
<div>
<h1>About</h1>
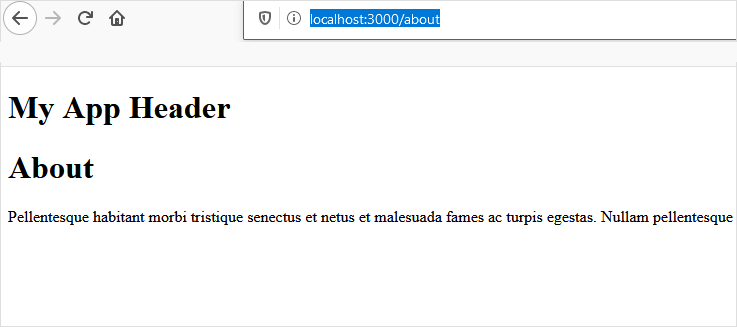
<p>Pellentesque habitant morbi tristique senectus et netus et malesuada fames ac turpis egestas. Nullam pellentesque orci ac magna cursus, et bibendum ante venenatis.</p>
</div>
)
}
export default About;import React from 'react';
const Contact = () => {
return (
<div>
<h1>Contact</h1>
<p>Sed eget tincidunt urna, eget fringilla nisi. Mauris volutpat mi erat, ac suscipit erat mattis sit amet. Morbi a lobortis eros. Proin cursus ut sapien vitae iaculis.</p>
</div>
)
}
export default Contact;You can see that we have created simple components which will render a title and some text on the screen.
As you can see, each component is exported in order to be used in other files.

How to use BrowserRouter and Route?
In order to see how routes are actually working, we will add some code to index.js file and will explain it right away:
import React from 'react';
import ReactDOM from  'react-dom';
import { BrowserRouter, Route } from 'react-router-dom';

// COMPONENTS
import Home from './components/home';
import About from './components/about';
import Contact from './components/contact'

const App = () =>{
    return (
        <BrowserRouter>
            <div>
                <header>
                    <h1>My App Header</h1>
                </header>
                    <Route path="/" exact component={Home}/>
                    <Route path="/about" component={About}/>
                    <Route path="/contact" component={Contact}/>
              </div>
        </BrowserRouter>
    )
}

ReactDOM.render(
    <App/>,
    document.querySelector('#root')
)
We have imported React and ReactDOM (as we are working in a browser).
The important part comes now: we have imported BrowserRouter and Route from react-router-dom.
What are these actually doing? BrowserRouter is responsible with the routes inside a browser and Route tells React what to actually load on a specific route.
To be more clear, BrowserRouter is the one saying that the URL has changed and Route is the one which knows what to do when URL has changed. I hope that it makes sense.
As you can see, we have also imported the 3 components which we have created.
Then we define the App and a very important thing which you can notice it is the fact that we use Route inside the BrowserRouter. If you use Route outside the BrowserRouter tags it will never work!
For this line,we have used the word exact:
<Route path="/" exact component={Home}/>That is very important because it will help you to render only the About component when you will go to /about for example. Because /about contains also / and if we do not add exact to Home route, then it will render Home component too on /about.
So, right now, when you navigate to http://localhost:3000/about (don't forget to yarn start first in your Terminal), you will only be able to see this:
Add links for React app views
Right now, we can see the views if we type the correct address in the browser, but the best way is to have some links on home view from where we can navigate to the others.
You might think that these should be easy to be done as we can just add some <a href=""...> and that will do it. But the truth is that in React it does not work as this.
We need to import Link module from react-router-dom. So ouur line changes to:
import { BrowserRouter, Route, Link } from 'react-router-dom';This will allow us to create links in React.
We will add these links in the header like this:
<header>
    <h1>My App Header</h1>
    <Link to="/">Home</Link><br/>
    <Link to="/about">About</Link><br/>
    <Link to="/contact">Contact</Link><br/>
</header>
This will generate the links to the other views/pages.
Use Link options
Link has some options which we can use.
These can look like this:
    <Link to={{
        pathname: '/about',
        hash: '#history',
        search: '?mission=true'
    }}>About</Link><br/>
Pathname is actually the route. Hash and search will appear at the end of the URl like this: http://localhost:3000/about?mission=true#history.
These can be used when you have a little more complex project.
Use BrowserRouter props to generate dynamic URLs
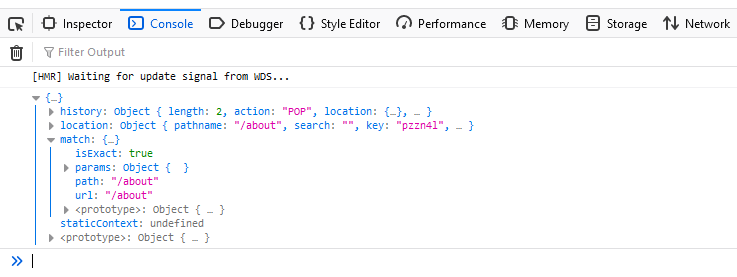
When we use BrowserRouter that will give us a lot of props. If you console.log props in one of the components, you will be able to see the below:
If we want to have a lik to /about/careers, when About component it is rendered, then we need to use some of these props. In React it does not work just to add a link to /careers,so we need to make this dynamic.
import React from 'react';
import { Link } from 'react-router-dom';

const About = (props) => {

    return (
        <div>
            <h1>About</h1>
            <p>Pellentesque habitant morbi tristique senectus et netus et malesuada fames ac turpis egestas. Nullam pellentesque orci ac magna cursus, et bibendum ante venenatis.</p>
            <Link to={{
                pathname: `${props.match.url}/careers`
            }}>Link to about/careers</Link>
        </div>
    )
}

export default About;
We have imported Link and for the pathname we use props.match.url which will give us the url where we are. You can add the same for the other components.
These are the basic things about React routes.
I have included below the whole React application and you can download it.
DOWNLOAD REACT ROUTES EXPLAINED APPLICATION
Don't forget to run npm install, because node_modules is not included in the above .zip.
Conclusion
Please let me know if this is helpful for you and contact me if you need more info.
Comments closed
Please contact me, if you have any questions or suggestions.